
I still remember when I fell head first into my love of makeup at the tender age of 16, I had just finished secondary school and was hoping for an image change when I started in my new school especially when I had been a total nerd back then. I didn't have a clue bout makeup, my mom refused to help me and there weren't many makeup gurus on Youtube back then. I ended up experimenting alot with drugstore makeup but eventually, I learnt what worked for me and what didn't. Knowing the awkwardness and fear of being in aisles full of makeup and not wanting to appear dumb to the snooty makeup counter girls, here's my take on a beginner's makeup kit for the makeup virgin:
1. Concealer & Foundation
The most tricky but the most important makeup to me. I recommend using powder foundation for beginners, because there is less chance of having to deal with a mess and having to feel sticky and oily when using liquid or cream foundations. I wouldn't reccomend BB cream as the shades are limited and often do not conceal blemishes as much as I would like. Try getting a liquid or cream concealer from the same brand as your beginning foundation and dab it gently with your fingers or a triangle sponge on the area you want to conceal, then gently dab the powder foundation all over the concealed area trying not to remove the concealer as much as possible before applying on the rest of your face.
The trick to finding the right shade is to apply a streak right on your jawline, if you can't see the colour, it's the perfect shade for you.
2. Eyebrow Pencil
Never use black eyebrow colour! It looks too harsh on your face and too fake, always use a dark brown shade if your hair is dark and go lighter if your hair colour gets lighter. The easiest method to colour your brows is to use a pencil and gently shade it into you existing eyebrow shape. It'll be alot easier if you get your brows professionally shaped first, alot of manicure places do it for like $10 or so, it hurts when you tweeze your brows but the pain is well worth it because you get slower regrowth.
Personally, I recommend the eyebrow pencils from Canmake, these retractable brow pencils do not even require sharpening. Just remember to brush the colour and use small, light strokes to achieve the most natural look, you do not want to look like you just used a crayon on your brows.
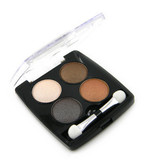
3. Neutral Eyeshadow Palette
The easiest colours to begin with are the brown/beige palettes, they're great for achieving natural looks or even darker, smoky looks if you use more colour. You can always experiment with them and brown suits most occasions (you wouldn't wanna wear glittery blue to a serious event right?). Most drugstore brands have a wide array of brown palettes, I personally adore Kate's. However, the best bargain find I've ever gotten was a Daiso eyeshadow palette, I know it sounds iffy but its seriously great for it's price of only $2! I use this 4 colour palette, but they have other choices depending on their shipment
4. Eyeliner
For beginners, the easiest eyeliner is the pencil version. Simply close your eye and gently pull your eyelid straight sideways, then go along the lashline with your eyeliner. Once you get the hang of it, you can always move onto gel or liquid liners for a different look. Black is a favourite colour but brown is more forgiving as any mess you make is less obvious, the choice is really up to you.
I reccomend Sana Super Quick slated pencil liner. It's a dark black, doesn't smudge easily, retractable without needing you to sharpen it and best of all, it's slanted on an angle making it easier for you to draw your eyeliner.
5. Eyelash Curler
Hold the lash curler as close to the base of your lashes without actually hurting your eyelid and gently squeeze and hold for about 10 seconds. The most natural curl I've achieved was by holding and curling the lashes in 3 sections (base, middle and close to the tips) for 10 seconds each but it's really time-consuming to do it. As much as I will like to recommend a drugstore version of a lash curler, I'm afraid I'm too used to Shu Uemura's version as I've been a fan of their lash curler for years. At $30++ for one, it isn't cheap, but it's a definite investment that lasts for years. However, if you're a poor student like how I was when I started out, you can always experiment with Daiso versions or brandless ones from the drugstore.
6. Mascara
After curling your lashes, quickly brush on your mascara to retain the curl of your lashes for an eye-opening effect. Brush on just enough to coat your lashes but don't go crazy and wind up with spider leg lashes, it isn't pretty. Also remember to let the mascara dry before deciding to close to your eyes tightly as you might wind up with panda eyes.
Recommendation is Deja vu's mascara, they have the Lash Knockout version for a thickening effect or the Fiberwig version for a lengthening effect. It depends on what effect you are looking for or you could also combine the two for a really intense look! Just remember to let the first layer of mascara dry first before applying the next layer, this will prevent clumping. Deja vu mascaras are also easy to remove, just apply running warm water and rub alittle bit, the mascara comes right off!
7. Blush
Gently pinch your cheeks till you see the colour on your cheeks. That's the most ideal shade of blush for you but the general rule is that pinks look better on fairer skin while orange tones look better on tanned skin. The trick is to add a natural glow to your face and bring back some colour after applying foundation. Powder blush is the easiest to control, just swirl a large blush brush in the colour and apply on the apples of your cheeks (smile and the curves you see on your cheeks are the apples), apply in a gentle sweeping motion in a "C" shape towards the sides of your forehead, but make sure most of the colour wind up on your cheeks not your forehead!
Cheap but good, Majolica Majorca's Puff de Cheek range maybe limited edition but I've seen quite a few stores still stocking them. Their colours suit most skintones and if you're really unsure, just use the peach tone as it's a nice cross between orange and pink, plus who can resist those adorable tins?

8. Tinted Lipbalm
A multi-purpose item, it will help you moisturise your lips (chapped lips are not a good look) while adding colour. As a tinted lipblam you get more bang for your buck and alot of drugstore brands are now producing tinted lipbalms in a variety of colours to suit your skintone and preferences.
I started by using a tinted Nivea lipbalm and it served me well for a few months before I decided to move onto proper lipstick and glosses, you could try Nivea's pearly shine lipbalm. It's moisturising, adds some colour and with the hint of shine, you'll look like you've also applied a hint of gloss.
9. Makeup Brush
The most basic brush to start with is a large blush brush, it can be used to not only apply blush but also for your powder foundation if you prefer a more natural look. Synthetic hair is alot cheaper then real hair and of course suitable for you if you're into the whole "save the animals" thing. Natural hair does last longer and is immensely softer then synthetic but I personally find synthetic to be more then adequate for most of my makeup needs.
The best beginner's makeup brush is Body Shop's blush brush and not the retractable version. Get the original as the hairs are more spread out resulting in better application while the portable, retractable version tends to get alittle splotchy as the hairs are pressed closer together.
The trick to starting with makeup is to try and look like a better version of you and not some whacked out celeb wannabe. Once you've got the basics of application down, you can always move onto more challenging makeup such as contouring and applying fake lashes. Makeup takes practise and I find it easier to learn by reading magazines though many of my friends often watch makeup gurus on Youtube.
Just remember that makeup is meant to be fun so don't forget to experiment some times and also good makeup starts with great skin, so don't forget to take care of your skin.
This is a good list! I didn't have any such guidance when I started out with makeup; I just went off what my sister used and slowly started to figure out what worked for me and what I liked. I actually had a hard time with pencil eyeliner since the ones I had at my disposal didn't tend to show up on my skin tone so well, so I ended up learning how to deal with liquid liner sooner rather than later. XD
ReplyDeleteAnyway, thanks for sharing! :D
I too didn't encounter such a list when I first started my journey with makeup, so I figured why not? Lol I guess in your case, circumstances made you learn quicker but that's good I guess!
ReplyDelete